

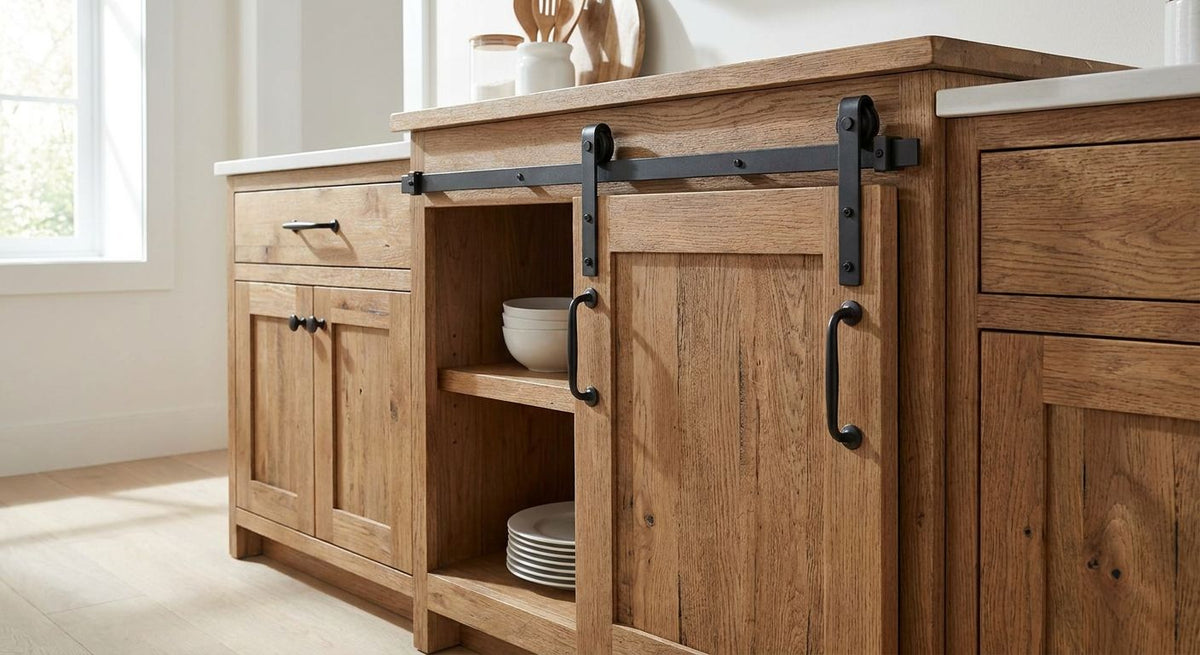
Sliding barn door cabinet hardware lets homeowners swap hinged or bifold doors for a single track-mounted panel that slides flat across the cabinet face, and it's the fix of choice when swing clearance is the real problem, not the door itself. Homeowners tackling this project work with lightweight panel doors sized for a pantry, laundry stack, or under-stairs cabinet — not a 200-lb bedroom slab — so the track, the mounting surface, and the pull hardware all need to scale down accordingly.
- Sliding barn door cabinet hardware suits lightweight panel doors on pantries, laundry cabinets and tight kitchens in 2026 — full bedroom-door track kits are overkill.
- Bottom-guided systems beat top-mount-only tracks for cabinet-scale doors because they stop panel sway at 3/4-inch thickness.
- Flush pulls or recessed edge pulls are the standard hardware pairing since a sliding panel has no room for a protruding knob.
- Skip the drill-and-hope approach — a jig gets pull holes square on the first try.
- Knobs.co carries the flush pulls and drilling accessories homeowners need to finish a sliding cabinet door retrofit.
Why this matters
A hinged cabinet door needs 18-24 inches of open-air swing space in front of it. In a narrow hallway pantry, a laundry nook, or an under-stairs cabinet, that space simply isn't there, and that's exactly why homeowners search for sliding barn door cabinet hardware instead of another set of hinges. The category overlaps with pocket door hardware for cabinets, which solves the same swing-clearance problem by sliding the door into the cabinet wall rather than across its face — worth comparing before you commit to a track.
The barn-door look adds a visual statement most pocket systems don't: an exposed rail and rollers read as a design feature, not just a mechanism. That's the tradeoff homeowners are weighing in 2026 — hidden mechanism versus visible hardware as style.
Why sliding barn door cabinet hardware matters for homeowners
Homeowners aren't buying this hardware for a 96-inch closet door — they're retrofitting a single cabinet, usually 12 to 36 inches wide, where a full-scale barn door track kit is both oversized and expensive to adapt. The constraints that separate this segment from a whole-door barn-door install are specific:
- No wall stud backing behind a cabinet face — the track has to mount to the cabinet carcass or face frame itself.
- Limited depth clearance behind the door — a rolling panel needs a flat surface to glide against, and most cabinets weren't built with that gap.
- Lighter door panels, usually 3/4-inch stock, meaning the rollers and track don't need the load rating of a full interior door.
- A finish that has to match existing knobs, pulls, and hinges in the same room, not stand alone as a feature wall.
Measure your cabinet opening and door weight
Get this step wrong and every part after it is a return. A cabinet-scale sliding door needs an opening measurement and a rough panel weight before you touch a track catalog.
- Measure width and height of the finished opening, not the existing door.
- Add at least a 1-inch overlap on each side so the panel fully covers the opening when closed.
- Weigh or estimate the panel — 3/4-inch plywood or MDF panels are the common cabinet-door weight class.
- Check depth behind the door for rail and roller clearance, typically 1 to 2 inches.
- Note whether the cabinet face frame can take screws without splitting the wood.
Choose your track system
Top-mount-only tracks are the cheapest option and the most common mistake. A cabinet-scale panel needs a bottom guide or it sways every time someone brushes past it.
- Top-mount rail with a floor or shelf-mounted bottom guide — the standard for stability.
- Bottom-guided pocket track if the cabinet has a hidden interior wall to slide into.
- Surface-mount barn rail scaled to cabinet width rather than door width — confirm rail length matches your opening, not a stock 6-foot interior-door rail.
- Dual-track systems for two overlapping panels on a wider cabinet opening.
Pick a door panel that fits the track
The track dictates panel thickness tolerance more than style does. Confirm compatibility before finishing or painting a panel.
- 3/4-inch solid wood or plywood panel — the most common thickness for cabinet-scale sliders.
- Slab panels with no applied molding, since raised panels add depth the roller hardware may not clear.
- Pre-primed or pre-finished panels if you want to skip a painting step after install.
- Panels cut 1 inch wider than the opening on each side for full coverage.
Select pulls and finish hardware
A sliding panel has nowhere for a knob to stick out — it will catch on the frame or the neighboring panel. Flush pulls and recessed edge pulls solve that.
- Flush pulls set into a routed recess, flush with the door face.
- Recessed edge pulls along the panel's leading edge for a cleaner front.
- Finish matched to existing cabinet hardware in the same room — mixing satin nickel pulls with matte black hinges elsewhere reads as unfinished.
- Order a free hardware sample from Knobs.co before committing to a finish across an entire wall of cabinets.
Knobs.co stocks flush pulls for sliding cabinet doors in the finishes homeowners are already running elsewhere in the kitchen or laundry room, which is where the faster path beats a generic hardware-store flush pull with one finish option.
Install the track and drill the pull holes
This is where measuring twice pays off. A track mounted a half-inch off level binds the panel within a week.
- Level the top rail using a 4-foot level, not a phone app on a short cabinet run.
- Pre-drill pilot holes sized to the screws supplied with the track kit.
- Use a cabinet hardware jig to place flush pull holes at consistent height across multiple panels — freehand drilling on a visible sliding face shows every mistake.
- Test the panel's roll before final tightening; loose rollers need adjustment now, not after paint.
Add stops, soft-close, and floor guides
A sliding door without a stop eventually slides off the end of the rail — usually onto a foot.
- End stops at both ends of the rail to prevent overtravel.
- A floor or shelf guide to keep the bottom edge from swinging outward.
- Soft-close dampers if the track system supports them — worth it on any cabinet a household uses daily.
- Anti-jump blocks on exposed barn-style rollers to keep the panel seated on the rail.
Match the finish across the room
Sliding barn door cabinet hardware becomes the visual anchor of whatever wall it's on, so a mismatched finish stands out more than it would on a hinged door.
- Confirm rail, roller, and pull finishes are close enough to read as intentional, not a bin of spare parts.
- Check finish against existing knobs and pulls in the same sightline.
- Order samples of two finish options side by side before ordering full sets.
“If the panel wobbles when you push it, the track is missing a bottom guide — that's the single most common install mistake on cabinet-scale sliding doors.”
Comparing sliding door hardware options for cabinets
| Option | Best for | Key limitation |
|---|---|---|
| Top-mount rail with bottom guide | Single cabinet doors 12-36 inches wide | Needs floor or shelf clearance for the guide track |
| Bottom-guided pocket system | Cabinets with a hidden interior wall cavity | Requires interior depth most stock cabinets don't have |
| Surface-mount exposed barn rail | Homeowners who want the rail as a visible design feature | Full-length rail can overwhelm a narrow cabinet face |
| Full-size interior-door barn kit adapted down | Wide island or pantry wall openings only | Oversized rollers and rail length for single-cabinet use |
Bottom-guided top-mount rail is the right call for most single-cabinet sliding door retrofits in 2026 — it's the only option on this list built to keep a lightweight panel stable without needing wall cavity depth the cabinet doesn't have.
Common mistakes homeowners make
- Buying a full interior-door track kit sized for a 96-inch door and adapting it down instead of buying a track cut for the cabinet opening.
- Skipping the bottom guide because the top rail alone looks like it holds the panel — it does, until someone brushes past it.
- Drilling pull holes freehand on a door face that's visible edge-to-edge in daily use, instead of using a jig.
- Mismatching finish between the new sliding hardware and existing knobs or pulls in the same kitchen or laundry room.
- Ignoring panel weight and mounting a heavier solid-wood slab on rollers rated for a lighter plywood panel.
FAQ
What is sliding barn door cabinet hardware?
It's a scaled-down track and roller system that lets a single cabinet door slide across the face of the cabinet instead of swinging open on hinges. It's built for lightweight, 3/4-inch panel doors, not full-size interior doors.
Is sliding barn door hardware better than hinges for cabinets?
It's better when swing clearance is the problem — tight pantries, laundry nooks, or under-stairs cabinets. Hinged doors remain the simpler, lower-cost choice when there's room for them to open.
Do I need a bottom guide for a cabinet sliding door?
Yes for daily-use cabinets. A top-mount rail alone lets the panel sway with every push; a bottom or floor guide keeps the bottom edge tracking straight.
What pulls work with sliding cabinet doors?
Flush pulls and recessed edge pulls are standard because a protruding knob catches on the frame or an adjacent panel. Knobs.co stocks flush pulls in finishes matched to common cabinet hardware lines.
Can I use a full-size barn door track kit on a cabinet?
You can cut it down, but the rail length and roller load rating are built for a full interior door, so you'll pay for capacity a single cabinet panel doesn't need.
What thickness should the sliding cabinet door panel be?
3/4-inch plywood or solid wood is the standard thickness for cabinet-scale sliding panels — thick enough to hold hardware screws, light enough for small rollers.
How do I keep pull holes lined up on a sliding cabinet door?
Use a cabinet hardware jig rather than measuring freehand. On a visible sliding panel, even a 1/8-inch misalignment shows.
One last thing
The detail homeowners skip most often is the end stop — a $10-and-under part that keeps the entire panel from sliding clean off the rail the first time a kid or a dog brushes past it at speed. Order it with the track, not after.